Technical Basics
Use Free Plug-in To Create A Comparison Table In WordPress

© Stephen Phillips – Hostreviews.co.uk / Unsplash
Product-comparison tables add enormous value to your affiliate site. Here, we show you how to create one quickly and easily, using free plug-ins and WordPress
Comparison tables are often used by affiliate marketers to compare products. Although they have disadvantages – chiefly that they don’t always display perfectly on the smaller screens of mobile devices – for many website owners, their advantages far outweigh their disadvantages.
Comparison tables can be created with relatively little effort, but because they summarise the key details of individual products, such as technical data or prices at a glance, they offer significant added value and authority to your website.
However, the creation of these tables can raise many questions, particularly for inexperienced site owners – the main ones being: which products do I compare in a comparison table, and which product details are important? In the following article, we aim to answer these questions and more, as well as show you how to create a comparison table with free WordPress plug-ins.
What To Include In A Comparison Table
When shopping online, it’s not always easy to find important product details quickly, without having to study a product page relatively closely. Many visitors have no idea what’s important about a specific product, and don’t know which specific characteristics to look out for when considering a potential purchase.
As a site owner, even if you write reviews of products and then only compare them with other products on the market that you haven’t yet tested, comparison tables are still a great way to outline these comparisons and create a market overview for a product.
The more information about a product a customer has at their fingertips, the more quickly they’ll make a purchasing decision. You’d think, therefore, that the more product details you include in a comparison table, the more positive the impact on your conversion rate will be.
However, when it comes to creating comparison tables, you should ensure that you only include the most important product details. Trivial information should not be listed under any circumstances, because it will result in a loss of clarity.
Also, if you include too much information, it may prompt your visitors to re-evaluate their decision, which can also have a negative effect on your conversion rate.
So you should compare only the most important and relevant product details. Of course, these are always dependent on the products chosen; however, two fields should always be present in any comparison table:
1. Image
Potential customers always like to know what a product looks like.
2. Current price
Price has a strong influence on any purchase decision. In the following example, our prospective buyer can go directly to Amazon.co.uk by clicking on the price. If they buy the product, you earn your commission incomes.
Okay, enough about the theory behind comparison tables, let’s start! We’re going to show you how to put together a comparison table using a simple example with two products.
We use one free plug-in for creating the table, which you can download directly via your WordPress backend: The TablePress plug-in: https://tablepress.org
Creating A Table With TablePress
TablePress is a plug-in that makes it easy to create tables in WordPress with no programming skills – it’s a great solution for those with little or no website experience. Once you’ve created tables using the plug-in, they can easily be copied and then adapted.
This is useful if you want to include several comparison tables with different products on your website. The Amazon Associates LinkBuilder plug-in can then be used to output current prices for the products in the comparison table.
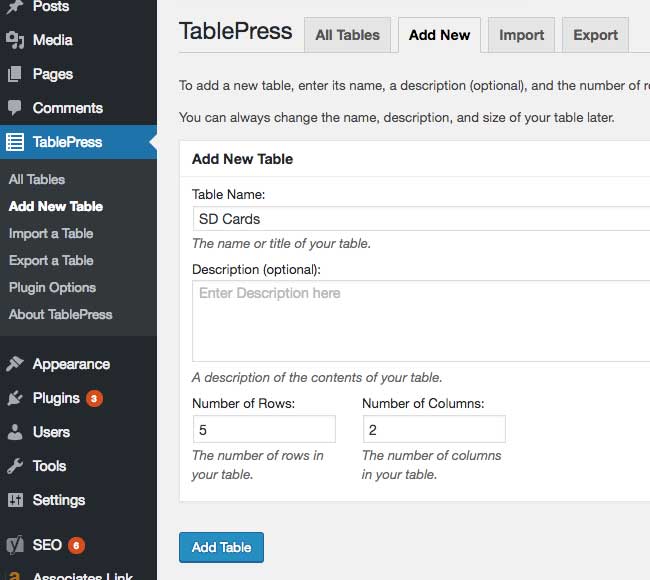
As you see in the picture above, our example table contains five lines for the product details. Likewise, we need three columns – one for each product. If you installed and activated the TablePress plug-in, the menu item ‘TablePress’ will appear in your WordPress menu.
Click ‘New Table’, and then assign a name for the table – adding a description is optional. Under ‘Number Of Rows’, select 5, and under ‘Number Of Columns’, select 3. Click ‘Add Table’.
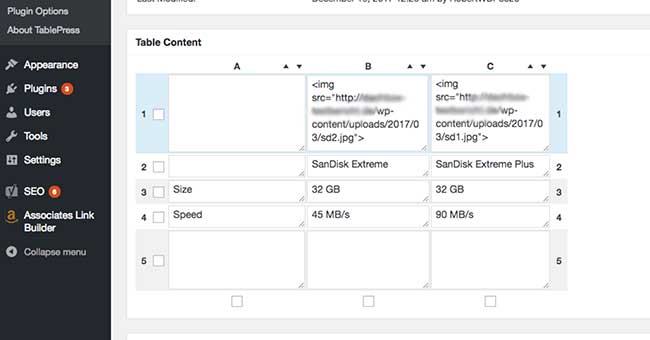
You will then enter the Edit mode for your new table. In the field ‘Table Contents’, you’ll see your previously assigned rows and columns, which you can now fill with content. These individual boxes can be enlarged for a better view.
Adding Images
In the cells of the first line, you can add images which are to be output later. We used homemade pictures of the SD cards we’re comparing. The pictures were created at a size of 100×140 pixels, and uploaded in advance to the WordPress Media Library.
You can use the following HTML code to embed the images:
<img src=”URL-YOUR-IMAGE”>
If you don’t know the URL of your pictures, go to the WordPress Media Library and click on the picture you want to use. The URL will be displayed in the upper-right corner of the ‘URL’ box.
After you’ve inserted the code for the images, you can also fill the other cells with the desired information. In our example, this is the name, memory location and write speed of each product. Your table should look something like this:
Also, fill the first cell of the last line with the word ‘Price’, so that your visitors understand what is being displayed in the line. If you have followed these steps correctly, then your table should look something like this:

Before you save the table, switch off the use of the DataTables. To do this, select the ‘Use DataTables’ checkbox under ‘Functions Of The DataTables JavaScript Library’. Then you can save the new table by clicking on ‘Save Changes’. Your new comparison table is ready!
Embedding your table in your website’s pages is made possible by using the TablePress Shortcode of the respective table. This is displayed slightly higher up the screen, in the Edit mode of the table.
Copy the Shortcode you find here and insert it at the place in a Post or Page where the table is to be output. The table can also be output as many times as desired, and in different places on your website.
A final note: tables created with TablePress are not automatically displayed responsively. This means that they won’t automatically resize depending on the device they’re being viewed on, and as a result, screen problems can occur on smaller screens.
The free Extension Responsive Tables solves this problem and can be downloaded free of charge. The Extension is not a must, but is definitely recommended, because the use of internet on mobile devices continues to rise. We hope you’ve enjoyed this tutorial – now you know how the principle works, you can create a table with many more products.