Affiliatemarknadsföring
3 ways to use Amazon SiteStripe links on your blog

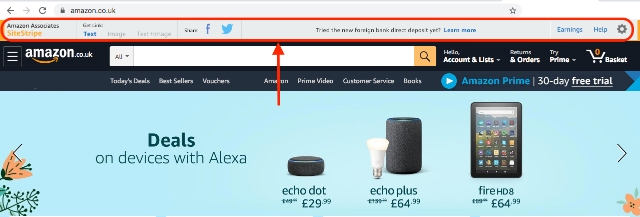
SiteStripe is a tool that is located in the Amazon Associates toolbar.
It’s a quick and easy way to include an in-text product link or image. That’s because SiteStripe creates short links without ever leaving the product page.
Why is this important?
Earning a passive income could start as soon as you click publish on your post. What’s key? Cut down the amount of time spent fiddling with the technical side of things! That’s what SiteStripe does.

So SiteStripe really reduces the turnaround time in generating affiliate links. Then, you can focus on the creative side of things.
But how does it all work?
How to use SiteStripe on blogging platforms
To start integrating SiteStripe links on your blogging platforms and other content platforms, you simply need to enable it in your account settings:
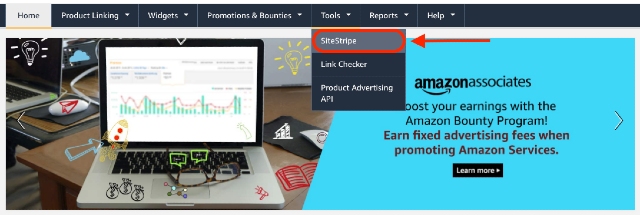
1. Log on to your Amazon Affiliates account and click on Tools, then SiteStripe and “Learn More”.

2. Once you have reached the SiteStripe page, make sure there is a green “ON” under the display menu.

3. If SiteStripe is not switched on or the display menu lists it as “OFF”, then just reactivate it and head to the home page again.

4. Double check SiteStripe is now enabled by heading to a product page to see whether the toolbar is now at the top of the item page.

5. Now start linking and sharing your favourite products with your audience!

What do SiteStripe links look like?
Most bloggers use a range of platforms to communicate with their audiences. This means that the linking styles they use must be just as versatile. Luckily, SiteStripe helps with this by providing three different options for how to display links:
Get Link: Text
The first type of link you can choose is a simple text link. Just choose whether you would like a short or long link. Then, integrate it into your written content via the text editor.

Click the ‘Text’ icon on SiteStripe to create a HTML code for a text link – no matter what Amazon product page you’re on. Note that a text link to a product may only be created when you are on the product page on Amazon.co.uk.
Your Tracking ID is automatically integrated into the link. If you have several Tracking IDs, you can choose between them via a drop-down menu.
Get Link: Image
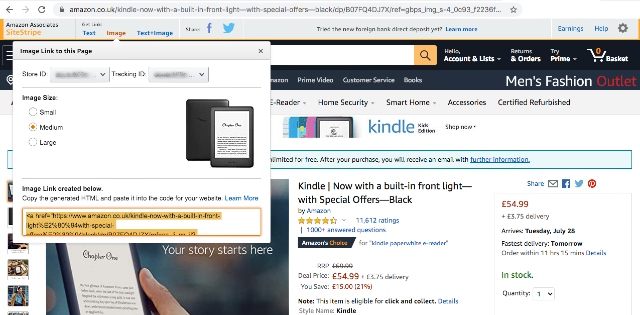
If you would like to link from an image directly, then selecting “Image” will create an HTML code for an image link. Again, you must be on a product page, and you can choose one of three image sizes.

The most-recently-used Tracking ID is inserted into the link, but you can also choose another Tracking ID from the drop-down menu.
Get Link: Text + Image
If you would like to push the product recommendation a little more and have it appear independently of the text, then “Text and Image” is the choice for you.

Clicking on ‘Text+Image’ in the widget on a specific product page creates the HTML code for a Link Box with the name, picture and current price of the product.
The Amazon logo and a ‘Buy’ button is integrated into this box. The most recent Tracking ID is automatically inserted into the link. However, you can also choose a different tracking ID from the drop-down menu.
How can I make settings and adjustments for SiteStripe?
Although the SiteStripe is flexible, you might need to make an adjustment for your preferred settings. Don’t worry, this is easily done and just needs you to click on the “Settings” gear on the far right of the SiteStripe menu.

Here you can amend any settings or even just double check what your current settings are.

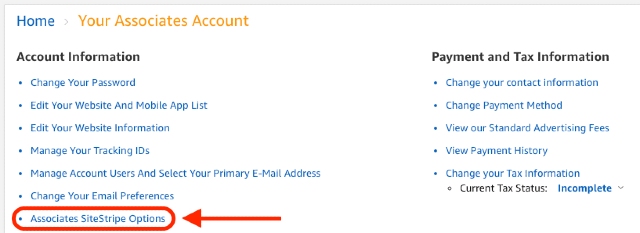
Alternatively, you can also access the SiteStripe options by clicking on My Account > SiteStripe Options within the Amazon Associates Program.

If you have any questions, just reach out to Amazon’s support team for a helping hand.
So what are you waiting for?
Now that you have SiteStripe enabled, adding affiliate links to your content should take less time than ever before. Faster link creation means your audience has the chance to see and can start clicking on your links sooner than you thought.
Check out your Amazon Associates settings and enable SiteStripe now.
